
Supplies:
- 1 to 3 styrofoam cones, preferably in different heights
- 1 bag of pine cones (may need more, so maybe grab two)
- brown craft paint
- hot glue gun
- gold spray paint
- gold glitter
- pliers (Michelle called for heavy duty scissors, but since I didn't have one, I resorted to these)
- paint brush or foam brush
- newspaper for your work surface and for spray painting

1. Paint the styrofoam cones with the brown craft paint. This is so that the white doesn't show through in between the cracks. Let them dry completely.

2. While waiting for the styrofoam cones to dry, spray paint the pine cones with gold paint. It doesn't have to be completely covered, just so there's a shimmer of gold on them. Go ahead and spray paint all the pine cones in the bag, since you will most likely run out! This put me on hold most nights. I kept on having to spray paint more.

3. Once the pine cones are completely dry, cut each petal using pliers or heavy duty scissors. This was a bit of a struggle in the beginning, but I found a good technique after a few times. Start from the bottom of the pine cone and work your way layer by layer, cutting as much of it off. This was my least favorite part!
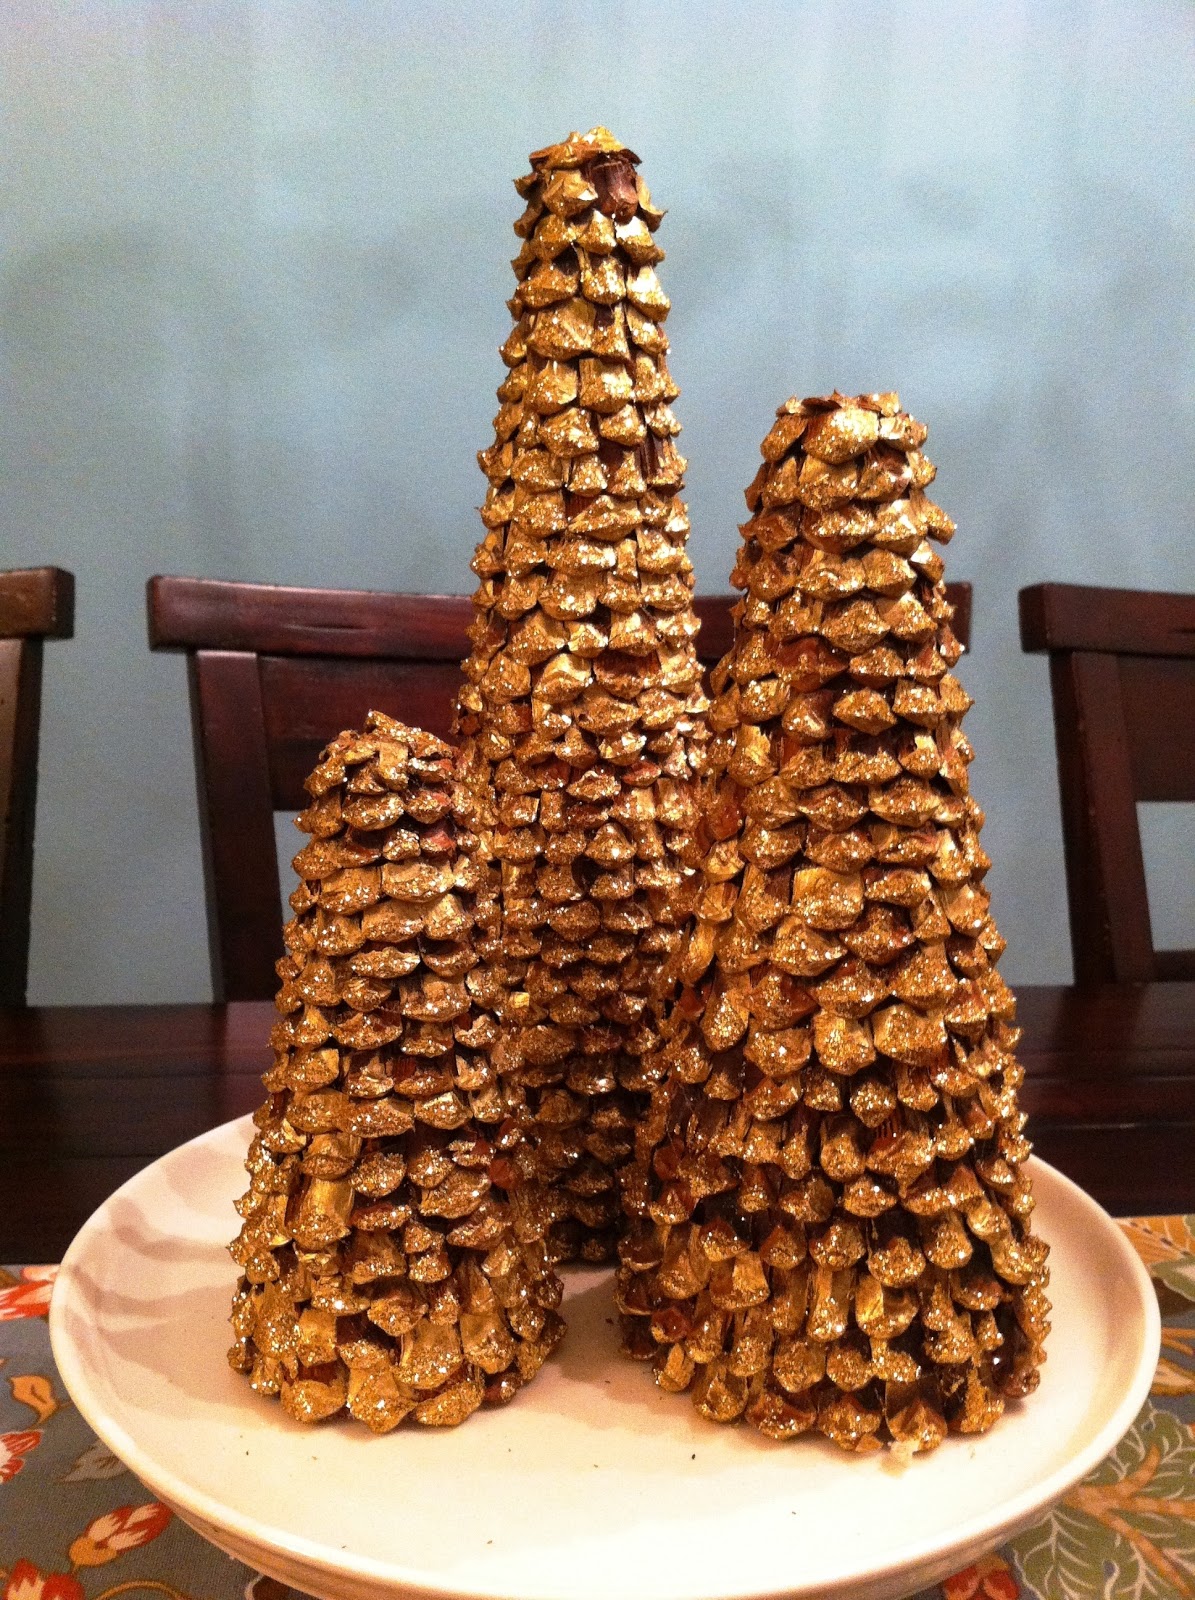
4. When your styrofoam cones are dry, and your petals are cut, you're ready to start gluing. Start from the bottom and work your way up. Put a line of glue on the styrofoam cone and start putting the petals right next to each other. For the next layer, make sure you overlap it with the first layer, kind of like shingles on a roof. This should go fairly quickly. When you get to the top, glue the petals with the pointy part facing up, that way it gives it a pointy top. I tried doing this on mine, but it didn't look as good as Michelle's.
 |  |
5. After you have covered the styrofoam with the pine cones, it's time to add a little bling! With a paint brush or foam brush, lightly brush on some of the mod podge on one section of the topiary. Don't cover the whole thing with glue, just on the tips to give it a light dusting. While it's still wet, sprinkle on the gold glitter until the glue is covered, and shake off any excess. Do this section by section until the whole thing is covered with glitter.
 |  |
5. Let the glue dry completely, and it's ready for display! I put mine on top of a cake stand and used it as a centerpiece for our dining room table.
Hmm, should have added some greenery on the cake stand. And I may need to fix the top of the second one.
Michelle was very smart and started this project back in November. If you want to try this, you still have about a week and a half before Christmas, so get to it! Or, make one for next year! And I bet you could do a silver version too, depending on your decor. I'll surely enjoy them for many Christmases to come!
Oh my! Beautiful trees! What a fun, super-detailed craft! Thanks for sharing. <3 www.rubygirlblog.com
ReplyDeletethank you! it was a little tedious but it was all worth it and was actually a lot of fun once i got on a roll!
ReplyDeleteAnd here I thought I had too much time on my hands. ;)
ReplyDeleteKCFS
I love this idea! It's seriously something I would buy at a store. Was it easy to break apart? I didn't know you could do that without crumbling it. I want to try this someday...I wish I had more time to do Christmas DIY projects!
ReplyDelete@KCFS - I have no life, I kind of like it! More time for crafts!
ReplyDelete@Tincy - I tried using regular scissors and that didn't work out so well, so I went with the pliers since that was the closest thing we had. It wasn't too hard. Some did crumble, but you have to try and get to the very base of it to keep it together.